What Is in the Box
Your Dinevate onboarding kit includes everything you need to start receiving online orders:
- Tablet — This is your order management device. All online orders will show up here.
- Tablet stand with NFC reader — A stand that holds the tablet and has a built-in NFC chip. Customers can tap their phone on it to visit your ordering website.
- Charging cable — To keep the tablet charged and always on.
- Business cards with QR code — Cards that have a QR code linking directly to your restaurant's online ordering website.
Setting Up the Stand
Your tablet stand is not just a holder — it is a powerful marketing tool.
Place the stand right next to your cash register where every customer can see it. The stand has an NFC chip and a QR code built in. Here is what that means for you:
- When customers tap their phone on the stand, it opens your restaurant's ordering website instantly.
- Customers can also scan the QR code on the stand with their phone camera.
- This lets your customers order directly from your website next time — no DoorDash, no UberEats, no Grubhub fees.
Why this matters: Third-party apps charge you 15-30% commission on every order. When customers order directly from your website, you keep all of that money. The stand is your silent salesperson — it works 24/7, every time a customer walks in.
Business Cards — Your Secret Weapon
Your kit includes business cards with a QR code that links to your restaurant's ordering website.
Here is the smartest thing you can do with them:
- Take a stack of business cards and keep them near your packing area.
- Every time you prepare an order for a third-party app (DoorDash, UberEats, Grubhub, etc.), drop one card into the bag.
- The customer scans the QR code on the card and discovers they can order directly from your website.
- Next time, they order from you — not from the app.
Think about it: If you do 20 delivery orders a day through third-party apps and you lose 25% in fees, that could be $50-$100+ per day going to the apps. Even if just a few customers switch to ordering directly from your website, you save thousands of dollars a year.
This is the easiest way to move customers off expensive apps and onto your own website. One card per bag — that is all it takes.
Turning On the Tablet
- Find the power button on the right side of the tablet.
- Press and hold the power button for about 3 to 5 seconds.
- You will see the screen light up. Wait for the tablet to fully start — this takes about 30 seconds.
That is it. Your tablet is now on.
Connecting to WiFi
The tablet needs an internet connection to receive orders. Here is how to connect it to your WiFi:
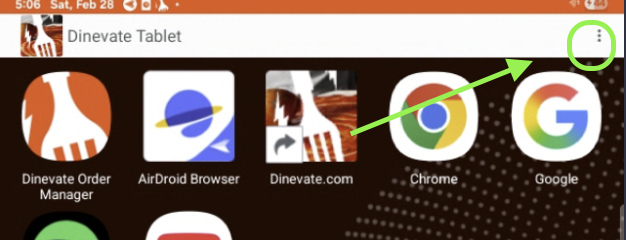
- You should be on the home screen (the main screen with all the app icons).
- Look at the top-right corner of the screen. You will see three dots ( ⋮ ) or a small menu icon.
- Tap on the three dots to open the quick settings menu.
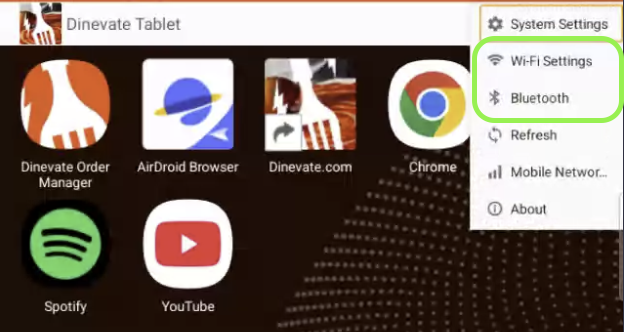
- Find Wi-Fi Settings and tap on it.
 5. You will see a list of WiFi networks. Find your restaurant's WiFi network and tap on it. 6. Enter your WiFi password and tap Connect. 7. Once connected, you will see a WiFi icon at the top of your screen.
Tip: Make sure you connect to a stable WiFi network. If your WiFi goes down, you will not receive orders until it comes back. If you have a backup WiFi or hotspot, that is a good safety net.
Pairing a Bluetooth Device (Optional)
If you have a Bluetooth receipt printer or another Bluetooth device, you can pair it now:
- Open the same three dots menu ( ⋮ ) in the top-right corner of the home screen.
- Find Bluetooth and tap on it.
3. Make sure Bluetooth is turned on (the toggle should be blue/green). 4. Put your Bluetooth device into pairing mode (check your device's instructions for how to do this — usually you hold a button on the printer for a few seconds). 5. Your device should appear in the list on the tablet. Tap on it to pair. 6. If it asks for a code, try 0000 or 1234 (these are the most common ones).
You can also set up printers later from inside the Dinevate Order Manager app (we cover that below).
Opening the Dinevate Order Manager App
Now that your tablet is connected to the internet, let us open the app:
- Go to the home screen (press the round home button or swipe up from the bottom).
- Look for the app called Dinevate Order Manager. It has the Dinevate logo on it.
- Tap on it to open the app.
The app will show a splash screen with the Dinevate logo for a few seconds while it loads.
Logging In
When the app opens, you will see a login screen.
- Enter the email address you used when you signed up for Dinevate.
- Enter your password.
- Tap Log In.
If you want the app to remember your login, check the Remember Me box so you do not have to type it every time.
Forgot Your Password?
No worries! Here is how to reset it:
- On any device (your phone, computer, or the tablet), go to dinevate.com/auth/login
- Click on "Forgot Password"
- Enter the email address you used to sign up.
- Check your email inbox for a reset link.
- Click the link and follow the steps to create a new password.
- Go back to the tablet and log in with your new password.
Selecting Your Restaurant Location
If you have more than one restaurant location, the app will ask you to choose which location you want to manage.
- You will see a list of your restaurant locations.
- Tap on the one you want to manage on this tablet.
- The app will log you in to that location.
If you only have one location, you will skip this step automatically.
Your Orders Dashboard
After logging in, you will see the main orders screen. This is where you will spend most of your time.
At the top, you will see four tabs:
- New — These are fresh orders that just came in. They are waiting for you to accept them. You will hear an alert sound when a new order arrives.
- Scheduled — These are orders that customers placed in advance for a future time. They will move to "New" when it is time to prepare them.
- Working — These are orders you have accepted and are currently preparing.
- Completed — These are orders that are finished (either delivered/picked up, or canceled).
You can also search for any order by tapping the search icon. You can search by customer name, order number, phone number, email, address, or even by menu items.
How to Accept an Order
When a new order comes in, you will hear an alert sound and see it in the New tab.
- Tap on the order to open it. You will see all the details:
- Customer name and contact info
- All the items they ordered and any special instructions
- Whether it is a pickup or delivery order
- Payment information
- Review the order to make sure you can prepare everything.
- Tap the "Confirm" button to accept the order.
- For orders that need to be ready as soon as possible (ASAP orders), you will see a time slider. You can slide it to tell the customer how many minutes it will take (anywhere from 0 to 120 minutes).
- The order moves to the "Working" tab.
If you have auto-print turned on, the receipt will print automatically as soon as you accept. Otherwise, you can tap the Print button to print it manually.
How to Complete an Order
When the food is ready and the customer has picked it up (or the driver has taken it):
- Go to the "Working" tab.
- Tap on the order you want to complete.
- Tap "Complete Order & Email Customer".
- The customer gets an email letting them know their order is complete.
- The order moves to the "Completed" tab.
That is it. Simple as that.
Delivery Orders — What to Do
When a delivery order comes in, here is what you need to know:
If You Use Dinevate Delivery
You do not need to do anything extra for delivery. Dinevate will dispatch a driver to pick up the order from your restaurant. Just:
- Accept the order like normal.
- Prepare the food as usual.
- Complete the order when the driver picks it up.
Dinevate handles the rest — finding the driver, tracking, and delivering to the customer.
You can also request Dinevate Delivery on any order by tapping "Request Dinevate Delivery" in the order details (there is a $10 fee for this).
If You Have Your Own Delivery Drivers
If you use your own delivery team:
- Accept the order like normal.
- In the order details, tap "Assign Driver" and choose one of your delivery drivers from the list.
- The driver will see the delivery in their own Dinevate app.
- When the driver is on the way, they can mark it as "On the Way" — the customer gets a notification and can track the driver on a map.
How to Reject an Order
Sometimes you might need to reject an order (for example, you are out of a key ingredient, or you are closing early).
- Tap on the order in the New tab.
- Tap the "Reject" button.
- A confirmation will appear asking if you are sure. Tap "Yes" to confirm.
What Happens When You Reject
- The customer gets an email letting them know their order was rejected.
- The order moves to the Completed tab with a canceled status.
- Rejecting does NOT automatically refund the customer. If the customer needs a refund, you will need to do that separately (see the Refunds section below).
Important: Only reject orders when you truly cannot fulfill them. Frequent rejections can hurt your customer relationships. If you are running low on something, consider updating your menu availability instead.
How to Process a Refund
Refunds are not done on the tablet. You process refunds from your Dinevate Merchant Dashboard on a computer or phone.
Here is how:
- Open a browser on your computer or phone and go to dinevate.com
- Log in with the same email and password you use for your restaurant account.
- Go to your Merchant Dashboard.
- Find the Orders section — you will see a table with all your orders.
- Find the order you want to refund.
- Click the three dots (actions menu) next to the order.
- Click "Refund Order".
- Choose whether you want a full refund or a partial refund:
- Full refund — gives back the entire amount to the customer.
- Partial refund — lets you enter a specific amount to refund (for example, if only one item was wrong).
- Select a reason for the refund (customer requested, duplicate order, fraudulent, or other).
- Click Confirm.
- You will see a 5-second countdown — if you change your mind, you can cancel before it goes through.
- The customer receives an email confirmation that their refund has been processed.
Note: Refunds go back to the customer's original payment method. It may take a few business days for the refund to appear on their statement.
Connecting a Printer
Connecting a receipt printer lets you automatically print order tickets when you accept an order.
Supported Printers
The app works with:
- Star Micronics printers (Bluetooth or network/LAN connection)
- Epson printers (Bluetooth or WiFi connection)
- Generic thermal printers (network/IP connection)
How to Set Up a Printer
- Tap the gear icon in the top-left corner of the screen to open the menu.
- Tap "Printer Settings".
- Tap "Add Printer".
- Choose how you want to find your printer:
- Auto Scan — the app searches for nearby printers automatically.
- Bluetooth — searches for Bluetooth printers specifically.
- Network — searches for printers connected to your WiFi network.
- Wait for the scan to complete. Your printer should appear in the list.
- Tap on your printer to select it.
- The app will run a test print to make sure everything works.
Printer Settings You Can Change
For each printer, you can set:
- Receipt type — Choose what kind of tickets this printer should print:
- Customer receipt — the receipt the customer sees
- Kitchen ticket — for your kitchen staff
- Pizza station — for your pizza prep area
- Salad station — for your salad prep area
- Number of copies — How many copies to print (1 to 10).
Tip: If you have multiple prep areas, you can connect multiple printers — one for the kitchen, one for the front counter, etc. Each printer can be set to print a different receipt type.
Auto-Accept and Auto-Print Settings
These settings can make your life much easier during busy hours.
In Printer Settings, you will find these options:
- Auto-accept new orders — When turned on, new orders are accepted automatically. You do not have to tap "Confirm" for each one. Great for busy times when you do not want to miss an order.
- Print tickets on accept — When turned on, receipts print automatically every time an order is accepted. No need to tap "Print" manually.
- Print kitchen receipts — When turned on, a separate kitchen ticket also prints automatically.
Recommendation: If you are a busy restaurant, turn on all three. Orders come in, get accepted, and tickets print — all without you touching the tablet. You can focus on cooking.
Managing Your Restaurant Status
You can control whether your restaurant is accepting orders and what types of orders you accept.
- Tap your profile picture in the top-right corner of the screen.
- You will see a panel with these options:
- Restaurant Status — Shows whether you are currently accepting orders or not. Tap it to turn ordering on or off.
- Pickup Status — Toggle pickup orders on or off.
- Delivery Status — Toggle delivery orders on or off. You may see separate toggles for:
- In-House Delivery — your own drivers
- Dinevate Delivery — Dinevate's driver network
- Appearance — Switch between dark mode and light mode. Choose whichever is easier on your eyes.
- Menu Manager — Tap here to update your menu, change prices, or mark items as unavailable.
- Log Out — Signs you out of the app.
Tip: If you are closing early or taking a break, turn off your restaurant status so you do not get new orders. Do not forget to turn it back on when you are ready!
Managing Your Menu
Your Merchant Dashboard on dinevate.com is where you manage your full menu — add items, set prices, organize sections, upload photos, and add modifiers like sizes and toppings.
From the tablet, you can also make quick changes (like marking an item as out of stock) using the Menu Manager in the gear icon menu.
We have a complete guide that walks you through everything: Managing Your Menu
Configuring Your Ordering Settings
Your Merchant Dashboard also has a full Ordering Settings area where you can control how online ordering works — pickup and delivery options, delivery zones and fees, tips, discounts, coupon codes, a loyalty program, service fees, order scheduling, notifications, and more.
For a detailed walkthrough of every setting, see our Ordering Settings guide.
Connecting Your Own Domain
If you already own a domain name (like myrestaurant.com), you can connect it to your Dinevate website so customers go straight to your site when they type it in.
If Dinevate bought your domain for you, it is already connected — you do not need to do anything.
For everyone else, we have a full step-by-step guide with instructions for GoDaddy, Namecheap, Google Domains, and more. Check out our Connect Your Domain to Dinevate guide.
Getting Help
You are never on your own. If something is not working, if you have a question, or if you just need someone to walk you through a feature — we are here for you. No question is too small.
Dinevate has a Support Center where you can reach our team and get help fast. Here is how to use it:
- Open a browser on your computer or phone and go to dinevate.com
- Log in with your restaurant account.
- Go to your Merchant Dashboard.
- In the sidebar menu on the left, click "Support Center".
- Click "Create New Case" to open a support request.
- Fill in the details:
- Problem area — Pick what it is about (Online Ordering, Menus, Payments, Delivery, etc.)
- Subject — A short title for your issue (for example, "Printer not connecting" or "Order not showing up")
- Description — Tell us what is going on. The more detail you give, the faster we can help. You can also attach screenshots if that helps explain the problem.
- Click Submit and your case is created.
What Happens Next
Our support team is very reactive — we respond quickly. You will receive an email notification as soon as we reply to your case. You can also check back in the Support Center at any time to see updates and continue the conversation with our team.
Every case is tracked from start to finish, so nothing falls through the cracks. You can see the status of all your support cases — whether they are open, in progress, or resolved.
We mean it when we say we are here to help. We have helped hundreds of restaurant owners just like you get set up and running. Whether it is your first day or your hundredth, reach out anytime. That is what we are here for.